Documentation
Everything you need to set up your account, connect a database, and get the most out of Redbrix.
Quick start
Three steps to get from nothing to browsing your data.
- 1Create your account at the Redbrix registration page, using an email address or your Google or GitHub sign-in.
- 2Allow Redbrix through your firewall. Your database server needs to accept connections from
13.134.60.54/32on your database port (usually 3306 for MySQL). This is the step most people get stuck on — if your database is on a hosting provider, the setting is usually called remote access, allowed hosts, or trusted sources. - 3Sign in and add your connection — the host, port, database name, username and password. Redbrix reads the structure of your database and builds the interface for you.
The rest of this page covers each step in more detail, along with database user permissions and what to check if a connection fails.
Introduction
Redbrix is a powerful tool designed to simplify and enhance your development workflow. Given its capabilities, it is extremely easy to get started. On this page, you will find instructions on how to set up your account, create a connection to your database and begin using Redbrix within minutes.
Redbrix account registration
To get started with Redbrix, you need to create an account, which you can do via the Redbrix registration page. You can create an account with an email address or you can log in with Google or GitHub.
Connecting your database
⚠Important! If you are hosting through a third-party provider, they must allow external access to the database server. Not all providers allow this, e.g. Ionos.
After logging in to your Redbrix dashboard, you will be prompted to connect your database. Redbrix currently supports MySQL and MariaDB databases only (though we will introduce support for PostgreSQL and MS SQL Server in the future).
Enter your connection details, specifically:
- Host: The address of your database server (a hostname or IP address).
- Port: The port number your database server is listening on (default for MySQL or MariaDB is 3306).
- Database Name: The name of the specific database you want to connect to.
- Username: Your database username.
- Password: Your database password.
Once you have entered the required information, click the "Connect" button. Redbrix will attempt to establish a connection to your database. If the connection is successful, you will be taken to the main dashboard where you can start exploring your database and using Redbrix features.
Allowing external access
If you are hosting your database on a third-party provider, you may need to configure your database server to allow external connections and ensure that your firewall settings permit access from Redbrix's IP addresses. You should allow connections from the following IP addresses:
Address          Subnet Mask         Port
13.134.60.54     255.255.255.255     3306
13.134.60.54/32
Golden rules for database schema design
In order for Redbrix to provide the best possible experience, there are a few golden rules to keep in mind when designing your database schema:
Use a compatible MySQL or MariaDB version
Redbrix currently supports MySQL 5.7 and later, though 8.0 or later is recommended. For MariaDB, 12.0 or later is recommended. You may be able to connect to MariaDB 10.3 or later, but this is untested.
Your mileage will vary with older versions. The basics should work fine but you should expect some rough edges and missing features.
Support for PostgreSQL and MS SQL Server are planned for the future, but there is no ETA at this time.
Use standard data types
Stick to standard MySQL data types for your columns. This ensures that Redbrix can properly interpret and display your data.
Redbrix interprets most MySQL data types and displays them in the application in the following formats:
- varchar, char, int, smallint etc. are displayed in single-line text fields on edit forms.
- date, timestamp fields are displayed in single-line text fields with an accompanying date picker.
- blob fields are displayed as file upload inputs and their contents rendered accordingly on record details panels.
- tinyint(1) fields are displayed as checkboxes.
- text are displayed in a default format suitable for their data type.
Define clear relationships
You should define your foreign key relationships explicitly. You can check a table foreign key definitions by running the following SQL query:
SHOW CREATE TABLE your_table_name;
You will see the defined foreign keys towards the end of the output. If there are any missing, it is highly recommended that you create them using the following SQL command:
ALTER TABLE child_table_name
ADD CONSTRAINT fk_name FOREIGN KEY (child_column) REFERENCES parent_table(parent_column);
Or, if you're happy with a default constraint name, just
ALTER TABLE child_table_name
ADD FOREIGN KEY (child_column) REFERENCES parent_table(parent_column);
Properly defined relationships allow Redbrix to provide powerful features like automatic relationship mapping and intuitive data navigation.
Include primary keys
Ensure that each of your tables has a primary key defined. This allows Redbrix to uniquely identify records and provide features like editing and deleting records directly from the UI.
Avoid reserved keywords
Try to avoid using MySQL reserved keywords as table or column names, as this can lead to issues with query execution and may require additional escaping.
User permissions
Configuration permissions
Redbrix decides who sees the configuration tools (e.g. custom labels and title fields) from the database login's own permissions — there's nothing extra to configure inside Redbrix.
Admins
A login that can also change the database's structure. They additionally see the configuration tools.
You do not need a MySQL "root" or server-wide superuser for this, and you shouldn't use one for everyday work. Create an ordinary login and grant it structural rights on just the one database you use with Redbrix.
Regular users
A login that can read, and optionally add/edit/delete, data. They get the full data experience; the configuration tools are simply hidden.
Data permissions
The permissions assigned to the database user with which you connect to Redbrix will determine which functions are accessible within the application.
| Permission | Effect in Redbrix |
|---|---|
| SELECT | Allows the user to view records in a table. The table will be present in the table menu on the left-hand side of the application. |
| INSERT | Allows the user to create new records in a table. The "New" button will be present on the table summary view function bar. |
| UPDATE | Allows the user to edit existing records in a table. The "Edit" button will be present on the record details section. |
| DELETE | Allows the user to delete records from a table. The "Delete" button will be present on the record details section. |
You can assign these permissions to different users to control their access to various functions within the application. For example, if you want to create a user who can view and edit records but not delete them or create new ones, you can run the following statements:
CREATE USER 'your_user'@'%' IDENTIFIED BY 'your_password';
GRANT SELECT, UPDATE ON your_database.* TO 'your_user'@'%';
It is worth reading up on MySQL user management and permissions to understand fully the implications of these commands, particularly section 15.7.1 Account Management Statements in the MySQL documentation.
Basic usage
Once you have connected your database, you can start using Redbrix to manage and interact with your data. The main dashboard provides an overview of your database structure, including tables and their relationships.
You can click on any table to view its contents, add new records, edit existing records, or delete records. Redbrix also offers powerful filtering and sorting capabilities, allowing you to easily find the data you need.
Table admin page
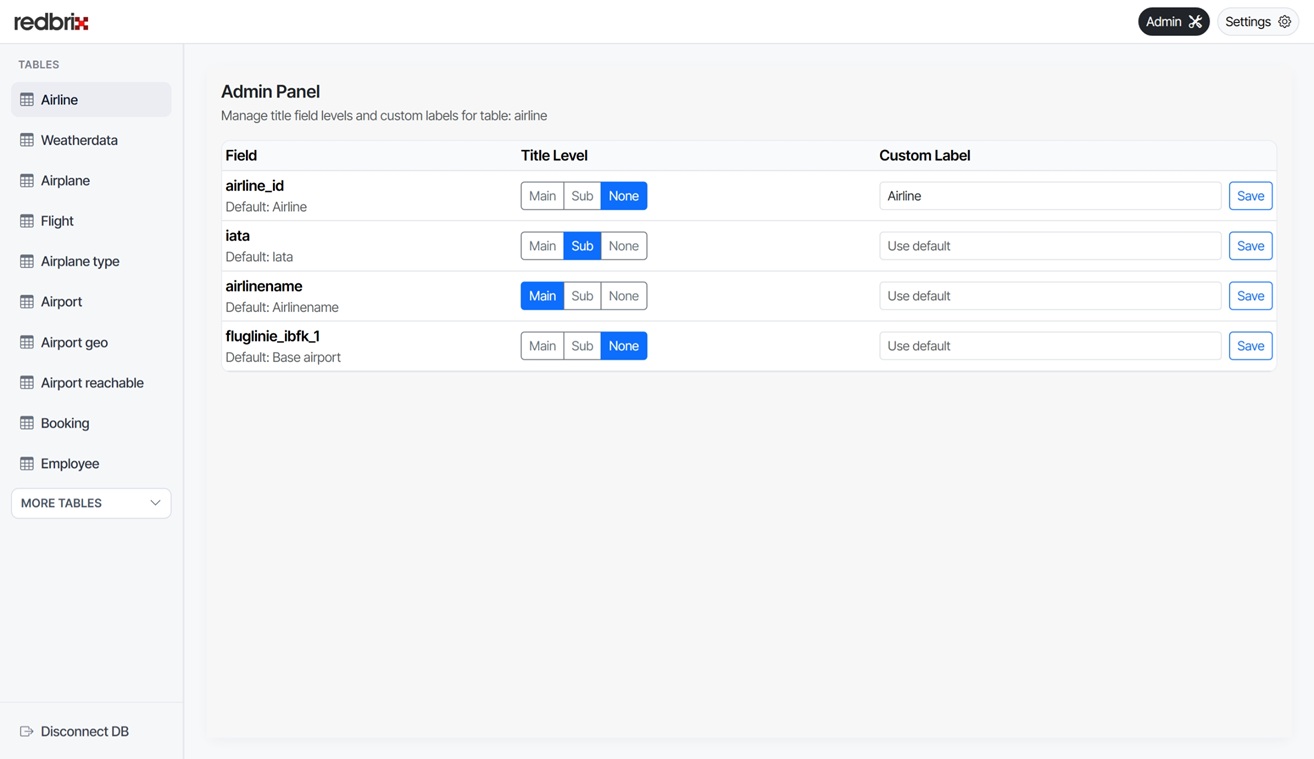
You can customize certain display elements for each table on its admin page, specifically:
- Column labels: You can set custom labels for each column in the table, which will be shown in the UI instead of the raw column names from the database.
- Title field: You can define a title field for the table, which is used to represent records in relationship views and other places where a human-readable identifier is needed.
⚠Note that these features are purely for display purposes and do not affect the underlying database in any way.
These settings are stored as metadata in the Redbrix application and will not be reflected using any other method of accessing your database, such as a direct SQL query using the MySQL shell or any other application that accesses the data.
To access the admin page for a table, click on the "Admin" button in the top right corner of the page.
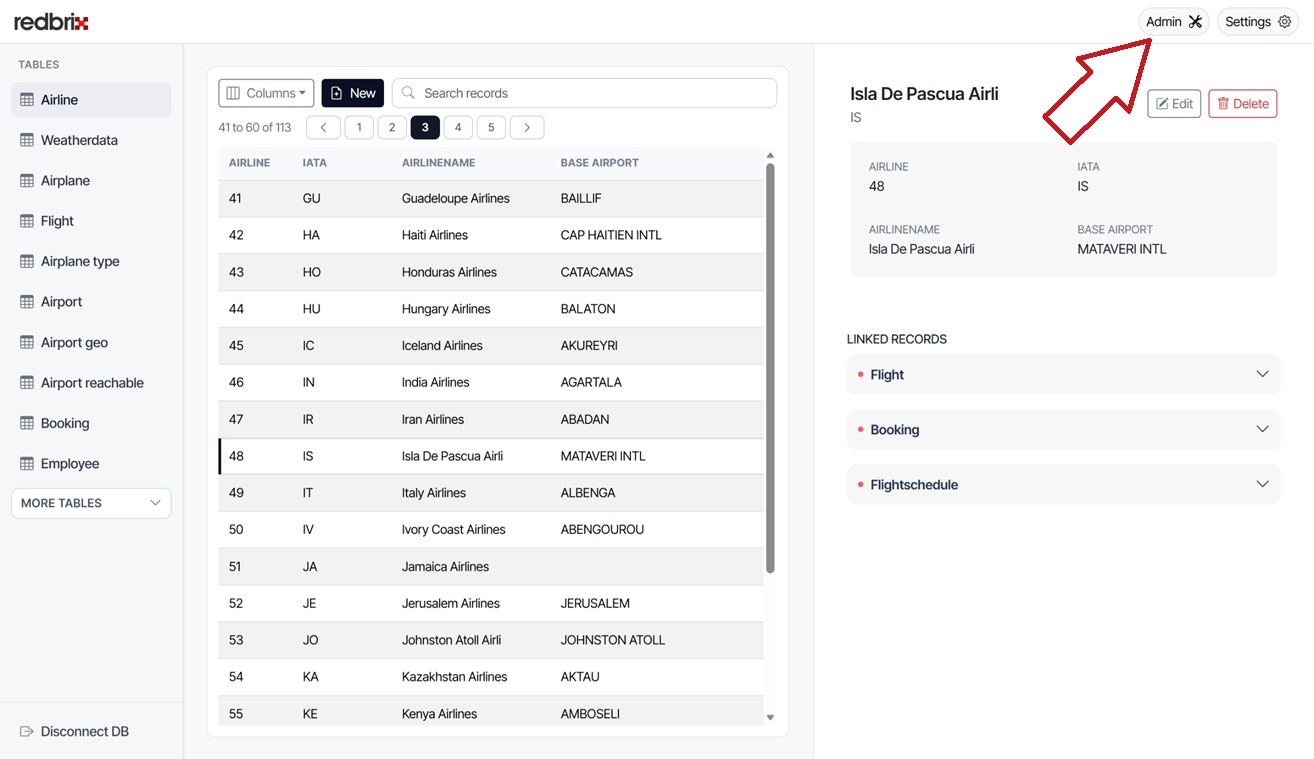
This will take you to the admin page for the table, where you can set custom column labels and define a title field. Remember to click "Save" after making any changes.
Title level settings
There are three values that are selectable for the title level for each field:
- Main: This will display the field value at the top of a record's details page and will be used when referencing records on this table from other table's views via foreign key fields.
- Sub: This displays the field values as subheadings on the record's details page but does not use the data when displaying values on other tables.
- None: The field is not used as part of the record's title or subtitle. This is the default behaviour.
If no fields are specified for the main title, Redbrix will use a suitable candidate, which will usually be a string field or combination of fields which have unique values.
Custom field labels
By default, Redbrix creates a slightly more "friendly" version of your raw underlying field names by replacing underscores with spaces and capitalizing the first letter of each word. However, you can set custom labels for each field on the table's admin page using the input fields in the "Custom label" column (see above), which will be shown in the UI instead of the default generated labels.
Again, custom labels are purely for display purposes, are held as metadata in the Redbrix application and do not affect the underlying database schema or data in any way.
Troubleshooting
This section covers some common issues you may experience when using Redbrix.
Record title not as expected
If you are seeing your record titles displaying unexpected data, check the title fields are defined correctly in the table admin page.
If the record titles are displaying correctly on their own record details pages but not when returned on a related table summary, then you should check that the foreign key relationship is defined specifically for that relationship.
Example
There is a table, "status", that is defined as follows:
+--------+--------------+------+-----+---------+----------------+
| Field  | Type         | Null | Key | Default | Extra          |
+--------+--------------+------+-----+---------+----------------+
| id     | int unsigned | NO   | PRI | NULL    | auto_increment |
| name   | varchar(30)  | YES  |     | NULL    |                |
| closed | tinyint(1)   | YES  |     | 0       |                |
+--------+--------------+------+-----+---------+----------------+
The `name` field is defined as a "main" title field and the table contains the following rows:
+----+------------------+--------+
| id | name             | closed |
+----+------------------+--------+
|  1 | New              |      0 |
|  2 | In progress      |      0 |
|  3 | Testing          |      0 |
|  4 | Client to revert |      0 |
|  5 | Resolved         |      1 |
|  6 | Closed           |      1 |
+----+------------------+--------+
This is referenced from the `status` field on another table, `call`, which is defined as follows:
+--------------+--------------+------+-----+---------+-------------------+
| Field        | Type         | Null | Key | Default | Extra             |
+--------------+--------------+------+-----+---------+-------------------+
| call_ref     | int unsigned | NO   | PRI | NULL    | auto_increment    |
| request_type | int unsigned | YES  | MUL | NULL    |                   |
| priority     | int unsigned | YES  | MUL | NULL    |                   |
| summary      | varchar(255) | YES  |     | NULL    |                   |
| description  | text         | YES  |     | NULL    |                   |
| status       | int unsigned | YES  | MUL | NULL    |                   |
| raised_by    | int unsigned | YES  | MUL | NULL    |                   |
| assigned_to  | int unsigned | YES  | MUL | NULL    |                   |
| created_at   | timestamp    | YES  |     | now()   | DEFAULT_GENERATED |
+--------------+--------------+------+-----+---------+-------------------+
However, despite the `name` field being defined as a "main" title field, the call summary is displayed like this:
| Call ref | Status | Summary |
|---|---|---|
| 1 | 1 | Printer out of toner |
| 2 | 3 | Temporary admin access required |
In this case, the issue is that there is no foreign key relationship defined specifically for the `status` field on the `call` table. To fix this, you would need to run the following SQL command to create a foreign key relationship between the `status` field on the `call` table and the `id` field on the `status` table:
ALTER TABLE call
ADD FOREIGN KEY (status) REFERENCES status(id);
After running this command, the call summary will display as expected:
| Call ref | Status | Summary |
|---|---|---|
| 1 | New | Printer out of toner |
| 2 | Testing | Temporary admin access required |
Connection problems
If Redbrix cannot connect to your database, work through the following checks:
- Host and port: Confirm the hostname or IP address is correct and that the server is listening on the port you entered (MySQL defaults to 3306).
- Remote access: Your MySQL server must accept remote connections. Also, if applicable, check that your firewall allows inbound connections from address
13.134.60.54on the database port (usually 3306 for MySQL). - User permissions: The database user must be allowed to connect from remote hosts. A user defined as
'user'@'localhost'will be rejected — you may need a'user'@'%'(or specific host) grant. - Credentials: Double-check the username, password, and database name. These are case-sensitive on most servers.
If you are still unable to connect, contact us and we will do our best to help.